



Move WordPress to FireStorm
-
Administration
- 30 Days Money Back
- Automatic payments
- Cancel a contract
- Change address data
- Change contact person (company)
- Change password
- Display bills
- Emergency support costs
- FAQ infrastructure and security
- Fewer Invoices
- Invoice by mail
- Manage Contacts
- Monthly consolidated invoice
- Partner administration
- Password Forgotten
- Payment methods
- Payment slip
- Product Transfer
- Recruiting friends
- Reminder
- Server Data Centre
- Setting up two-factor authentication
- Storage Overview for Resellers
- Top up credit
- Unlock Express
- Webmail Link
- weitere Artikel ( 21 ) Einklappen
-
Cloud Storage
- Add as network drive
- Create cloud storage user
- first steps
- Login Cloud Memory
- mount under Linux
- PC backup to the cloud
- weitere Artikel ( 1 ) Einklappen
-
DNS Service
- Change DNS entries
- Change SPF entry
- DNS API
- DNS API Powershell example
- DNS Entries in the DNS Package
- DNSSEC Deactivate
- DynDNS with a MikroTik router
- Let's Encrypt with Cert Warden
- Questions about DNS Service
- Set up your own SPF server
- SPF entry
- TLD's that support DNSsec
- weitere Artikel ( 7 ) Einklappen
-
Domain
- .ZUERICH DOMAINS Register
- Activate Whois Privacy
- Cancel domain
- Change contacts
- Change DNS entries
- Change DNS Server
- Check DNSSEC
- Configure domain for mail traffic
- Connect website to Squarespace
- Connect website with Wix
- Connect your website to Jimdo
- Deactivate DNS Records
- Difference in domain redirect
- DNSSEC
- DNSSEC Deactivate
- Domainreseller
- Enable Domain Access
- Enable domain forwarding
- Extend domain
- Google Optimization
- Google search optimization
- Google SiteVerification
- Link domain
- Own Nameserver
- Proper DNS records
- Questions about the domain
- Restore a domain
- Restriction forwarding
- Search engine registrationa
- Set up your own SPF server
- Transfer domain
- Use an external domain
- What is DANE/TLSA?
- What is MagicDANE?
- weitere Artikel ( 29 ) Einklappen
-
E-Mail
-
- Email does not reach me and the sender did not receive an error message
- Error "Client host rejected: cannot find your hostname"
- Gmail is blocking mails
- I get an error message when I send an email.
- I'm on a blacklist
- MacMail Problem: Required mailbox name to create ImapMailbox for (null)
- Proper DNS records
- Request emergency service
- weitere Artikel ( 3 ) Einklappen
-
- keine Artikel vorhanden
-
- keine Artikel vorhanden
-
- Change email password
- Create email address
- Create Email Forwarding
- Difference mailbox types
- DNSSEC
- Email Ports for IMAP, POP3, SMTP
- Emails using external provider
- Emails using external provider
- Exchange Konto übertragen
- Message "mailbox for user is full"
- Send e-mails
- Transfer Email
- Webmail Link
- What is DKIM?
- weitere Artikel ( 9 ) Einklappen
-
- keine Artikel vorhanden
- Are our e-mails encrypted?
- Automatic e-mail reply
- Backup emails locally
- Change password
- Customize e-mail addresses in the Microsoft Portal
- E-Mail Signature
- E-Mail-Transfer Outlook (PST-File)
- external name servers
- Gmail is blocking mails
- Important SPF entries
- JUNK Mail in Outlook
- Mail Log
- Newsletter Server important questions
- Office365 Logout and Setup
- OfficeMail Account Settings
- Report SPAM Mails
- Restriction forwarding
- Send e-mails
- Send email as attachment
- Set up email alias
- Setting up an email account in Thunderbird
- SPF entry
- Using OfficeMail
- Webmail Link
- Webmail Login does not work
- What is DANE/TLSA?
- What is DKIM?
- What is MagicDANE?
- weitere Artikel ( 23 ) Einklappen
-
-
Einrichtung
-
Server
-
-
- Add module PGSQL in PHP
- Change IP at Confixx
- Confixx 3.1 End User Manual
- Confixx 3.1 Special Edition Manual for Administrators
- Confixx Server DBD::mysql or other PERL module displays error message
- Release Confixx database
- Setting up Apache server compression in Debian
- Setting up Apache server compression in SuSE
- Swap Confixx license
- weitere Artikel ( 4 ) Einklappen
-
- Add PHP version to chrooted
- Apache2 does not start
- Automatic detection with Plesk Server (Linux)
- Create customer in reseller hosting
- Install Node.JS version
- LINUX: Apache Crash at log rotation at UBUNTU
- LINUX: MySQL Upgrade von 5.5 auf 5.6 mit Ubuntu
- Linux: Restart Network Interface
- Linux: Too many open files in Ubuntu
- List storage space from Reseller
- Plesk can't start PHP-fpm
- Plesk DNS Manager Extension
- Plesk ELS
- Plesk Linux: Enable NGINX and HTTP/2
- Plesk Log Files
- PostgreSQL Update
- Repairing databases
- Special character problems
- Upgrade MSSQL Server
- Use PHP version
- weitere Artikel ( 15 ) Einklappen
- Allow Support Team Access
- Backup setup
- Convert Ubuntu MBR to GPT
- Empty directory quickly
- Empty Mailq
- Enlarge partition at Ubuntu 16.04
- How do I log in via SSH?
- Monitoring of RAID controllers
- MySQL with Docker
- Optimize your server
- Plesk ELS
- Proxmox installation problem: Fix Black Screen
- Questions about the root servers
- Reinstallation
- Remove Ubuntu old kernels
- Repair Mysql / MariaDB databases
- repair quota
- Resetting Windows password
- restore very old website
- Server does not boot
- Set up Mysql replication server
- Set up Remote Desktop licence
- Setting up Jitl
- SNF filter does not start
- Start NGINX manually
- Websites sporadically unavailable
- Windows Server 2019 Change language
- WordPress installieren
- weitere Artikel ( 23 ) Einklappen
-
-
-
ShopDesigner
-
- 1.00 The most important questions about ShopDesigner
- 1.01 Set up your online shop
- 1.02 Add products to your online shop
- 1.05 Product categories and keywords
- 1.06 Inventory and Inventory Tracking
- 1.07 Shipping options
- 1.08 Tax rates
- 1.09 Importing products from a CSV file
- 1.10 product variants
- 1.11 AGB for your OnlineShop
- 1.13 Set currency
- 1.16 OnlineShop Analysis
- Add Google Calendar
- Booking and calendar tool for SiteDesigner
- SiteDesigner Backup
- weitere Artikel ( 10 ) Einklappen
-
-
SiteDesigner
-
- 01 Adding and moving content
- 02 Colors and fonts
- 03 Website designs
- 04 Use a stock image
- 05 change an image
- 06 Add page
- 07 Set up a store
- 09 Site analytics
- 1.01 SiteDesigner Quickstart
- 1.02 Add basic page information
- 1.03 Change the appearance of your page
- 1.04 Pictures, Galleries and Presentations
- 1.05 Text and headings
- 1.09 Hide incomplete pages
- 1.10 Forms, cards and other content
- 1.11 Setting Language, Currency and Units
- 1.14 Re-sort and rearrange pages
- 1.15 SiteDesigner Mobile and mobile phone quick start
- 1.16 SiteDesigner Tablet Quickstart
- 1.17 How does the Template Editor work?
- 1.20 Undo changes
- 1.22 Setting up a user-defined contact form
- 10 Setup a blog
- 12 Multiple language sites
- 15 Contact forms
- Add Google Analytics
- Add Google Calendar
- add more pages to SiteDesigner
- Add number of pages to my page
- Add type of content to my website
- Advantage of SiteDesigner
- Create a link to any page
- Definition SiteDesigner
- Edit Site Template CSS
- Edit SiteDesigner with HTML code
- Embed external website
- Export page from SiteDesigner and send it to another server via FTP
- good page ranking?
- pay by phone with credit card
- Request Backup
- Request emergency service
- SiteDesigner Move Package
- Take website offline
- Webhosting to the SiteDesigner?
- weitere Artikel ( 39 ) Einklappen
- 01 Adding and moving content
- 02 Colors and fonts
- 03 Website designs
- 04 Use a stock image
- 05 change an image
- 06 Add page
- 09 Site analytics
- 10 Setup a blog
- 12 Multiple language sites
- 15 Contact forms
- Add a Popup
- Change language
- Fixed menu in the SiteDesigner
- PopUp hinzufügen
- SiteDesigner access
- weitere Artikel ( 10 ) Einklappen
-
SMS Gateway
-
SSL Certificates
- Activate SSL certificate
- Activate SSL certificate for forwarding
- Browser is not supported
- Certification Requirement (CSR)
- Conditions to be fulfilled
- Creating a Certification Requirement (CSR) for Apache
- Definition SSL CERTIFICATE
- Difference Domain and Identity Certification
- Intermediate certificate
- Let's Encrypt does not work
- Requirements for issuing an SSL Certificate
- SiteSeal
- SSL in Java Keystore
- the right certificate
- Wildcard certificate
- weitere Artikel ( 10 ) Einklappen
-
Technical
-
- add a new node to the cluster
- Add LVM-Thin
- Cache Settings
- CloudInit set up
- Import Windows
- Important Proxmox commands
- Installation frozen
- LVM Rename
- Migration shows no progress
- Nested Virtualisation
- No Login Prompt on a VM
- Optimise performance
- Proxmox shutdown
- Proxmox with Highpoint does not boot
- Proxmox with question Mark
- Reinstalling Proxmox-Server in Cluster
- Remove Proxmox VM Disk
- Repair Proxmox Cluster
- Replace ZFS disk
- Run Proxmox with NVME RAID
- Run Proxmox with NVME RAID
- VM hangs: Booting from Harddisk
- weitere Artikel ( 17 ) Einklappen
-
-
Webhosting
-
-
- Bugfix: Wordpress does not work anymore
- Copy WordPress
- Customizing the domain of a Wordpress website
- Increase PHP timeout
- Increase WordPress file upload limit
- Installing Wordpress
- load-scripts.php 500 Internal server error
- Permalinks in Wordpress (Windows)
- Rename URL
- Switch off Wordpress maintenance mode
- Transfer Wordpress Website
- WordPress - Login button is not displayed
- Wordpress DSGVO Tools (GDPR) hacked
- Wordpress DSGVO Tools (GDPR) hacked
- Wordpress login doesn't work, password reset doesn't work either
- xml-rpc.php Forbidden
- weitere Artikel ( 11 ) Einklappen
-
- Adding email accounts
- Change email password
- Difference mailbox types
- Emails using external provider
- Emails using external provider
- I receive SPAM via my contact form
- Report SPAM Mails
- Set up e-mail
- Settings for Domains
- Spamfilter MagicSpam
- Spamfilter Plesk
- Transfer Email
- weitere Artikel ( 7 ) Einklappen
- Activate SSL certificate
- add another user
- Address book in Thunderbird
- Advantages of a website
- Backup Manager: restore your data yourself
- Blocking access for certain countries
- Browser Error Codes
- Change PHP version in Plesk
- Database user password change
- Disable Website Cache
- Enable Directory Listing
- external access to database server
- How to create a custom error page
- Log in to Plesk
- Moving Hosting Package
- NodeJS Setup
- PHP disabled functions
- PHP.ini configuration
- Planning tasks
- Plesk Backup Manager
- Protect Website
- Request Backup
- restore very old website
- Ruby einrichten
- Transfer Website
- weitere Artikel ( 20 ) Einklappen
-
-
Website-Builder
Move WordPress to FireStorm
What this tool does
With WordPress Import you bring an existing WordPress site to your FireStorm hosting yourself. Database, files, themes, plugins and media are transferred, and the addresses in your content are adjusted automatically. You need neither FTP access nor database skills, an administrator account on your previous site is enough.
What you need
- A FireStorm web hosting with a domain set up
- An administrator account on your previous WordPress site
- Your previous site must be reachable over the internet
Step 1: Download the connector
Log in to your Plesk panel and open WordPress Import under Dev Tools on your domain. Download the connector plugin as a ZIP file there.
Step 2: Install the connector on your old site
Log in to your previous WordPress site as an administrator. Go to Plugins, then Add New and Upload Plugin. Select the downloaded ZIP file and click Install Now.
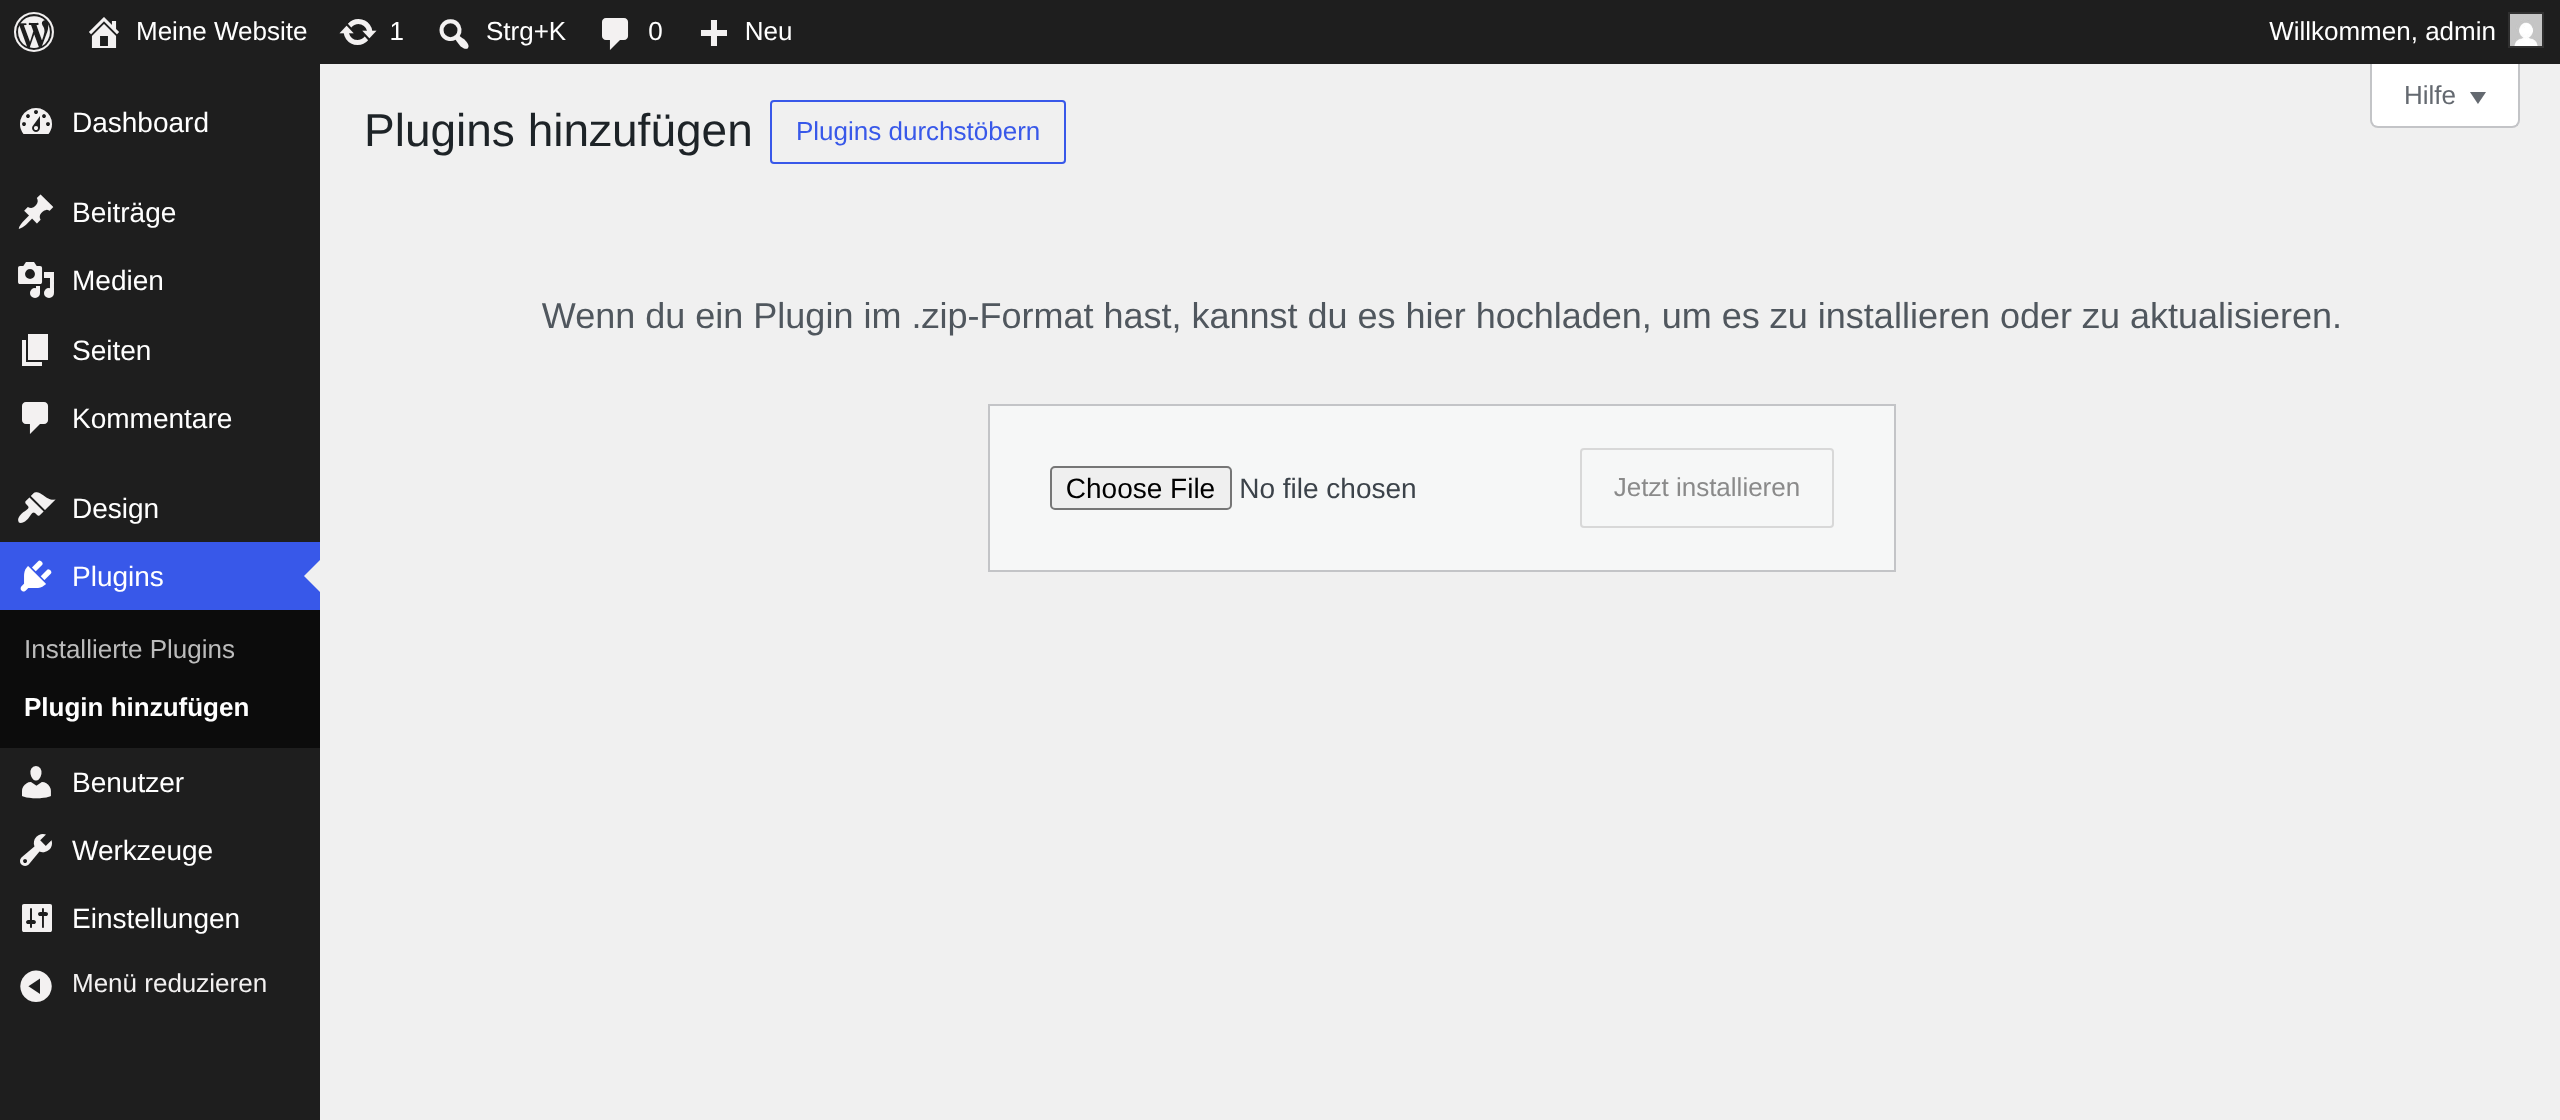
Then click Activate Plugin. The connector now appears in your plugin list.
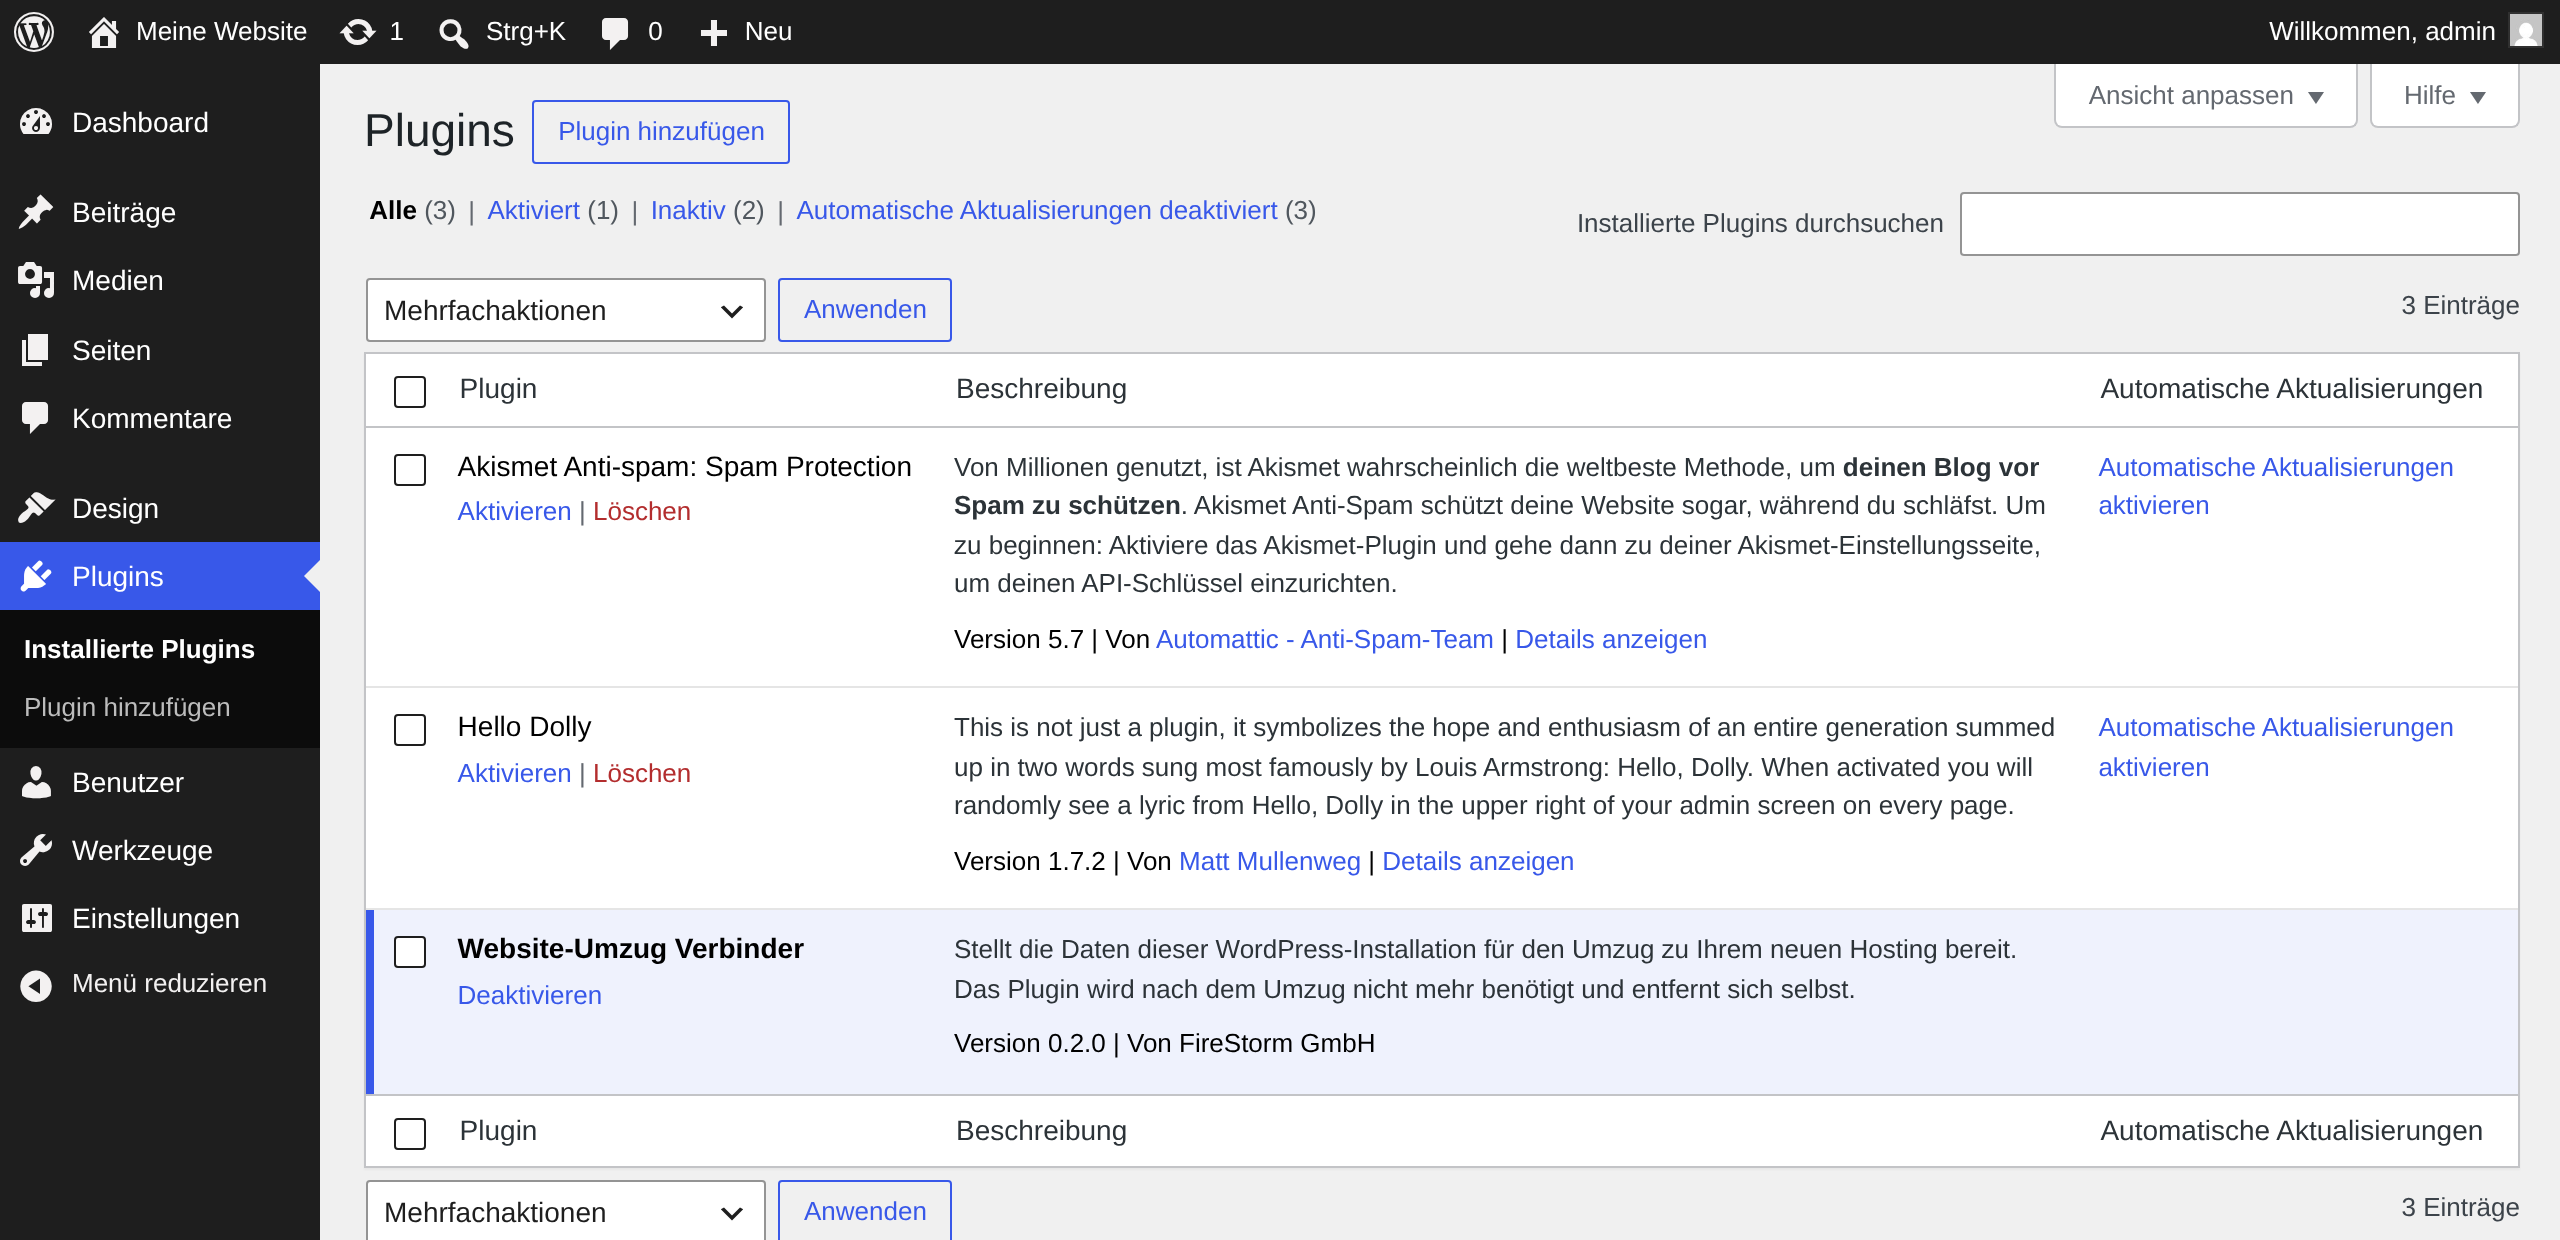
Note: the screenshots show a German WordPress installation. The menu entries are in the same places in every language.
Step 3: Copy the migration code
A new entry called Site Migration now appears under Tools in your old site.
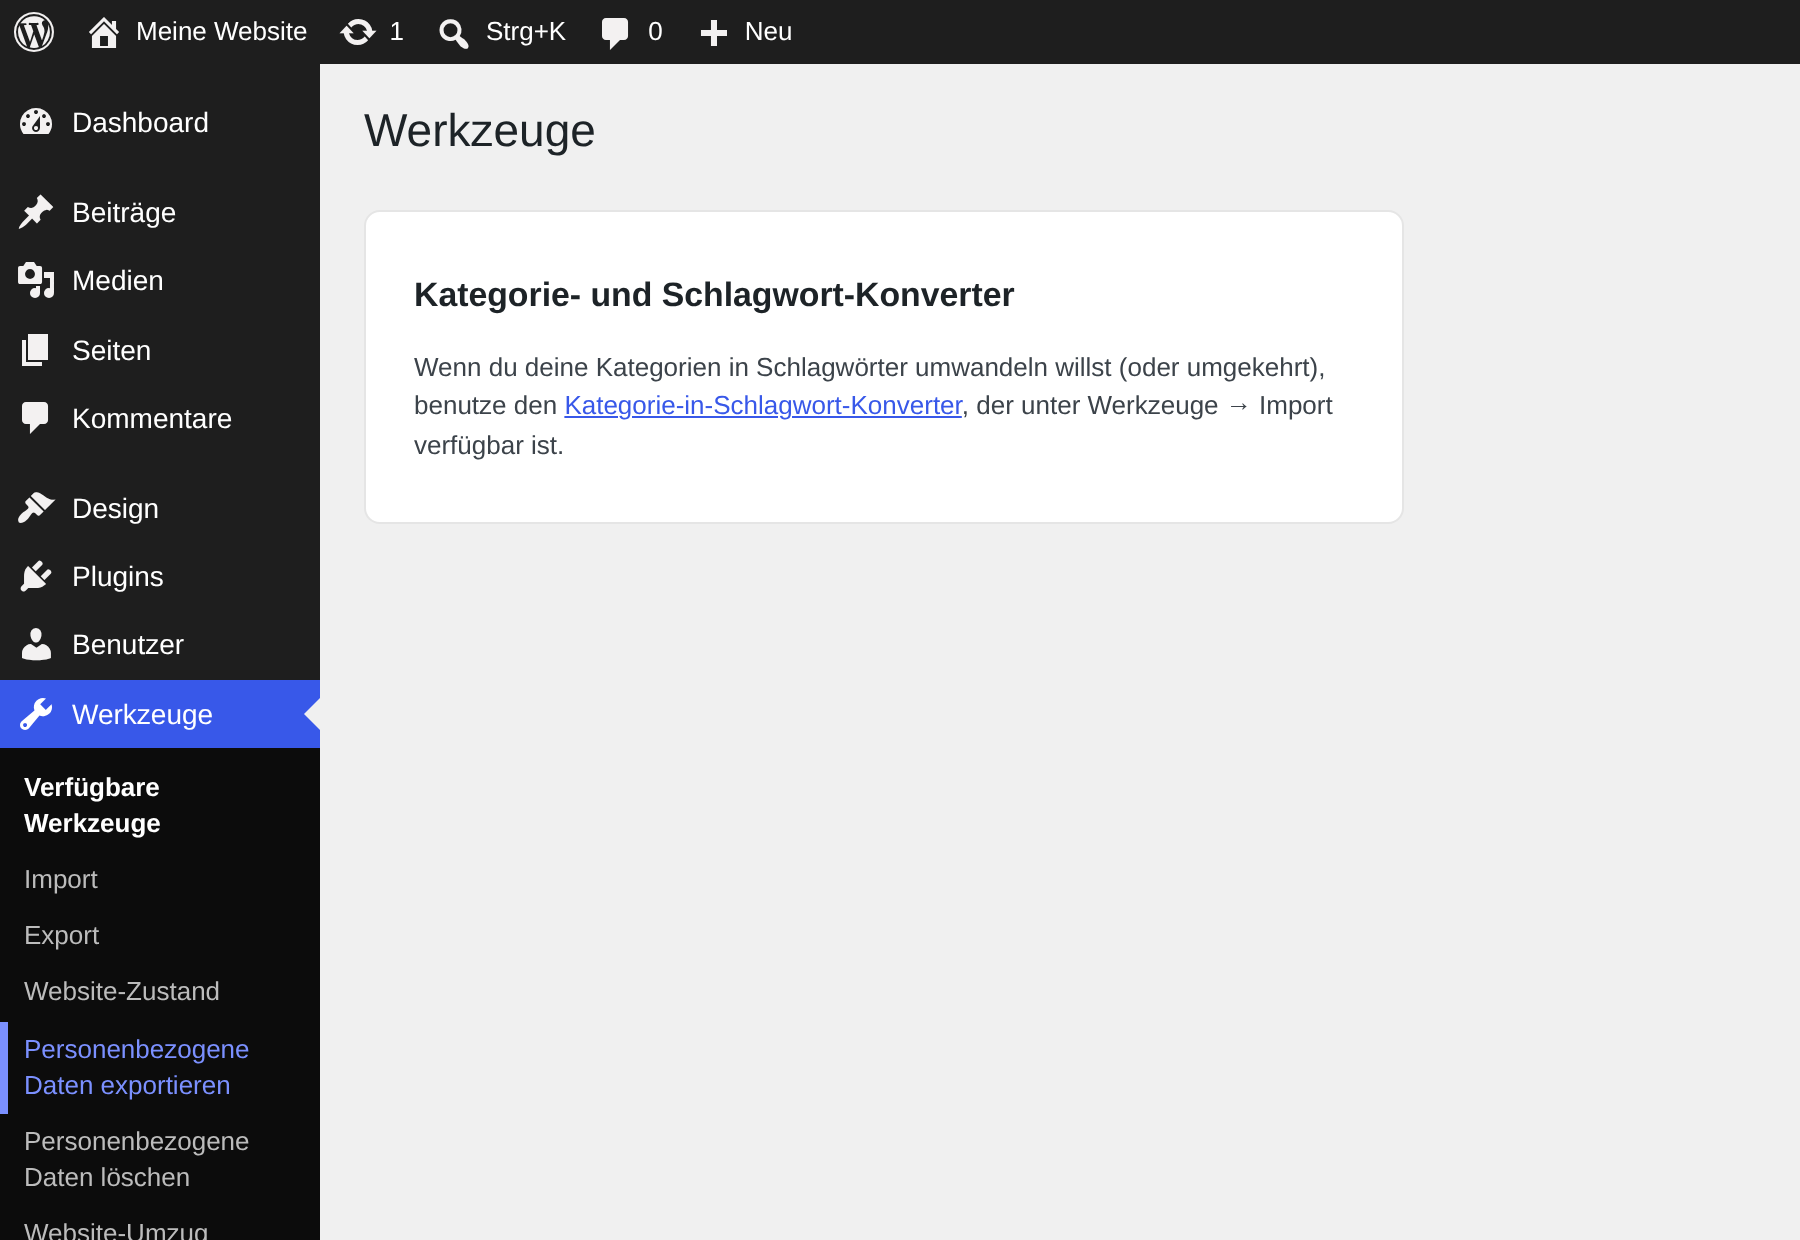
Open it. Your personal migration code is shown there. Click Copy.
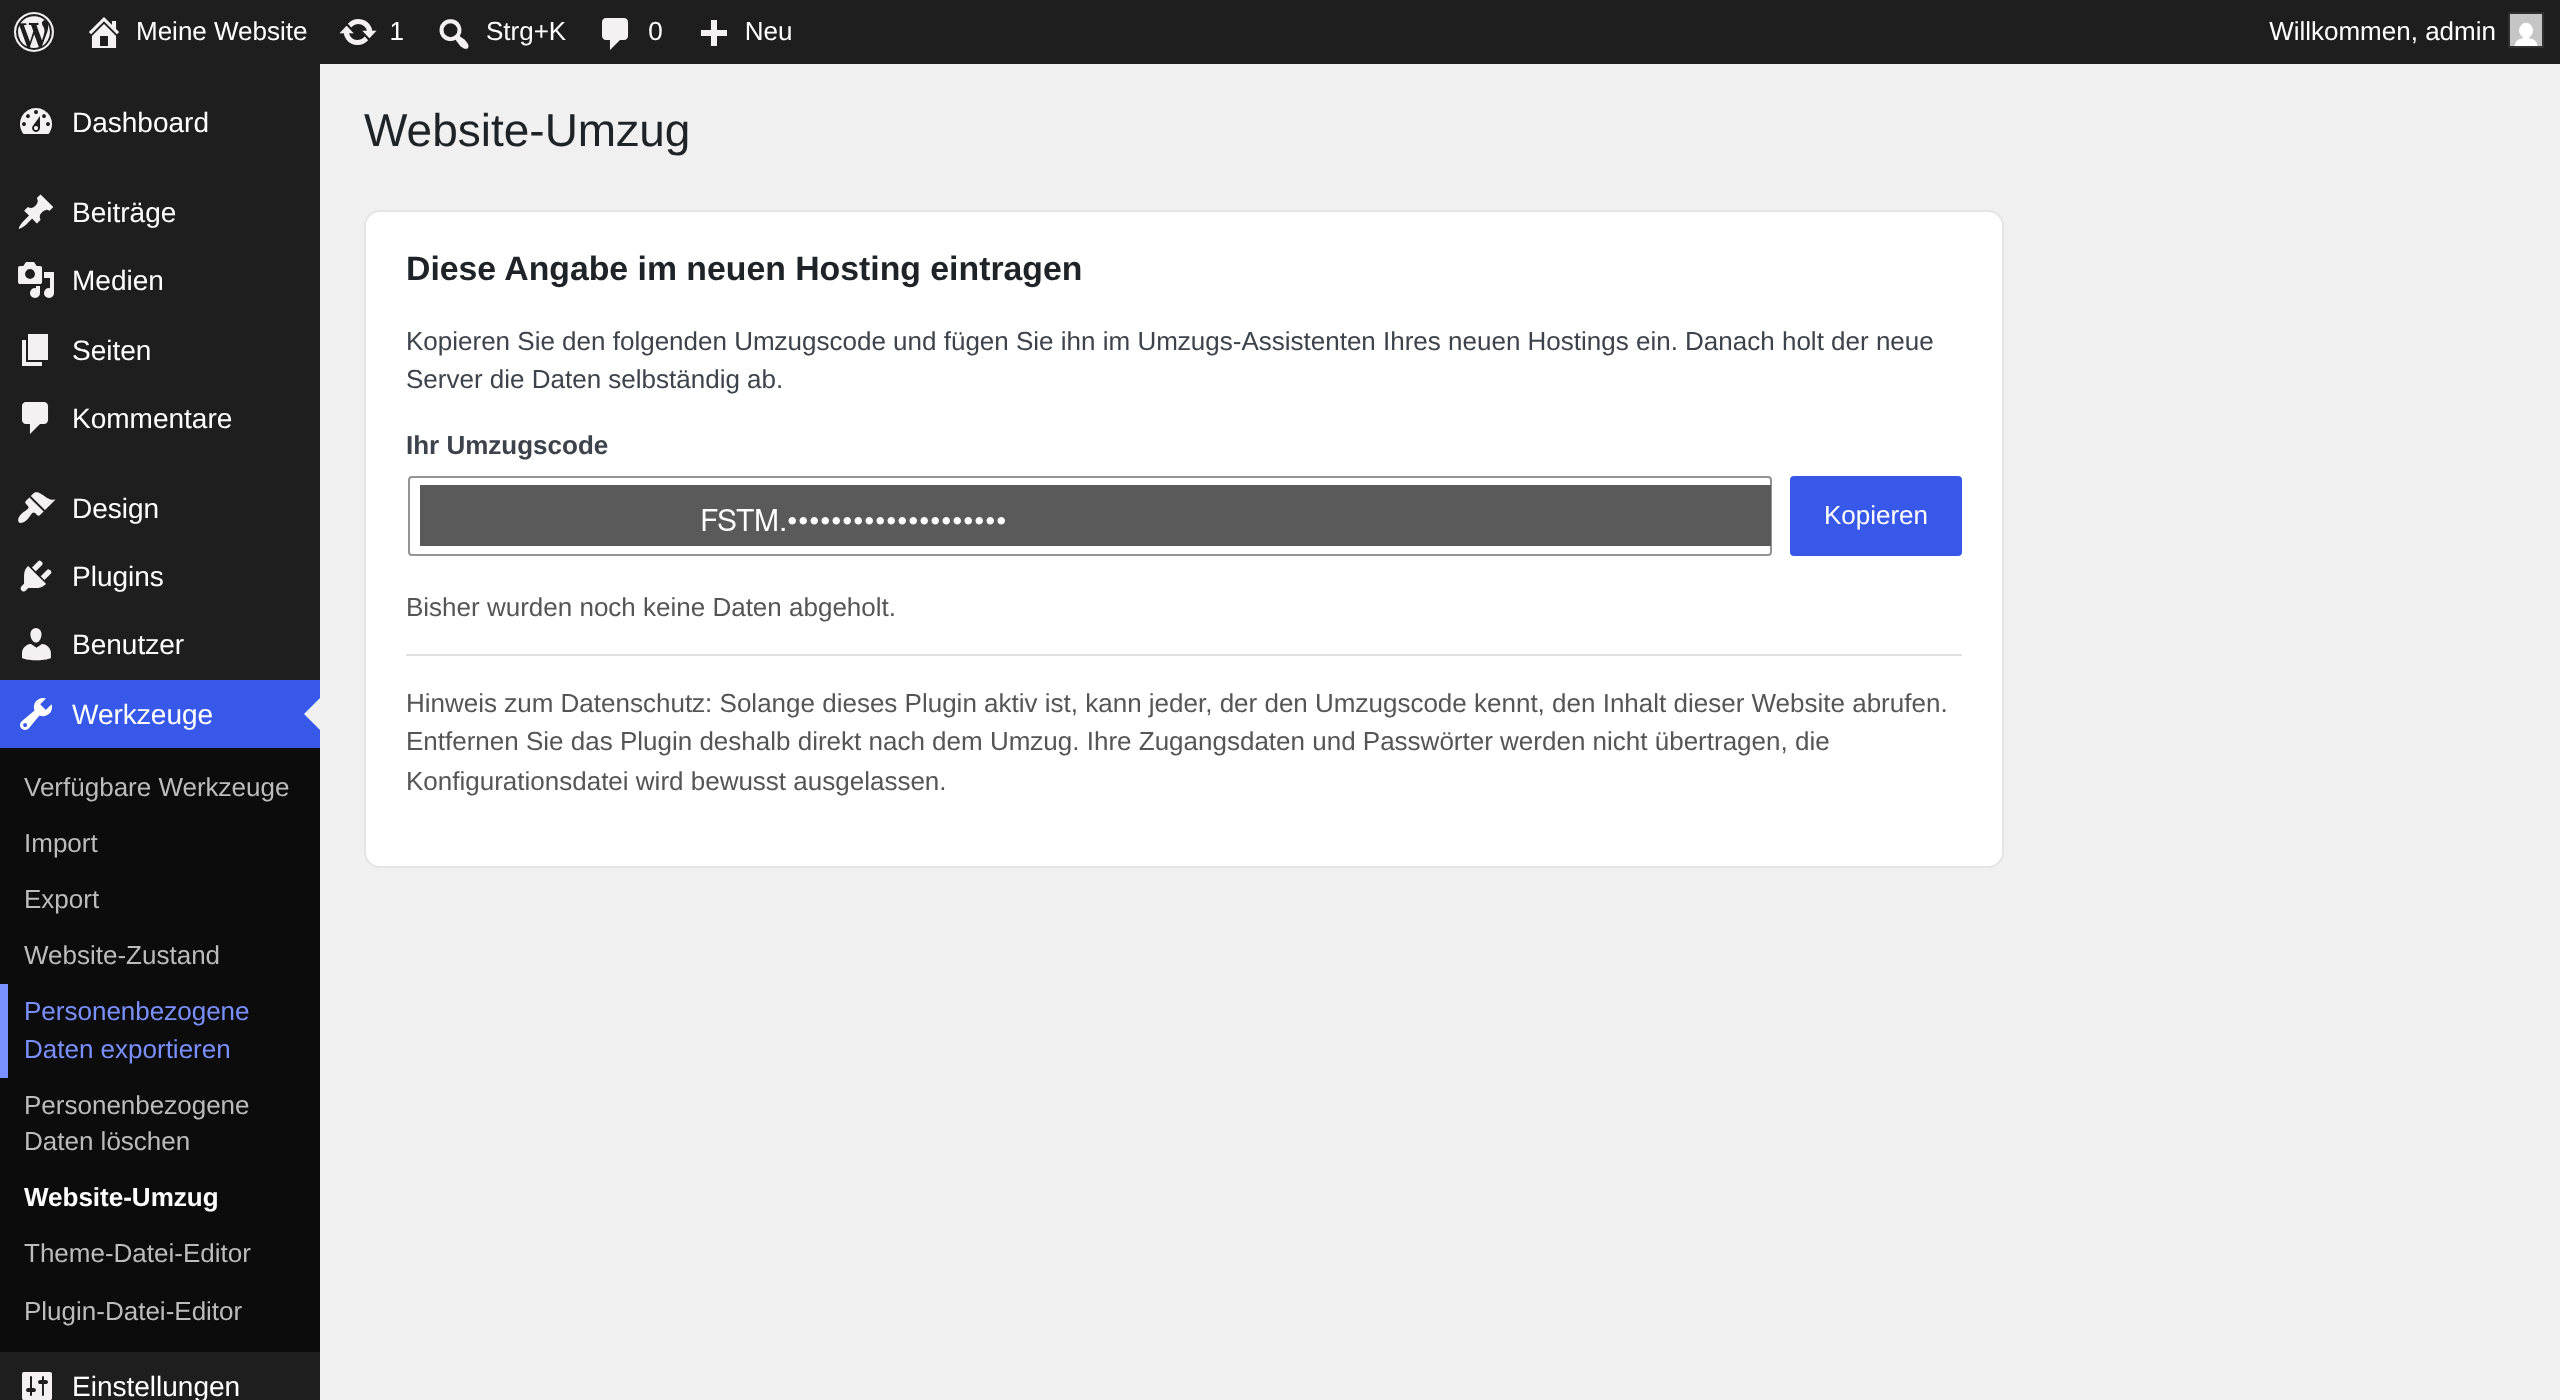
The code already contains your site address, so there is nothing else to note down. It is valid for 24 hours and renews itself automatically afterwards.
Step 4: Start the migration
Switch back to the Plesk panel and paste the code into the Migration code field. One click on Start migration is all it takes.
Progress is shown live. Depending on the size of your site, the process takes a few minutes up to several hours. You can close the window in the meantime, the migration continues on the server.
Step 5: Check the site and clean up
Once the migration is complete, check your site with us. As long as the domain still points to the old server, you can reach it through an entry in your hosts file or after switching the name servers.
Then remove the connector plugin from your old site. A single click on Remove plugin now is enough. This matters, because as long as the plugin is active, anyone who knows the migration code can retrieve the contents of your old site.
Good to know
Existing data is replaced. If files already exist in the target directory, they are moved into a folder with a timestamp before the import and replaced by the transferred site. They are not lost, but they still take up disk space.
Your credentials are not transferred. The configuration file of the old site is deliberately left out. We create a new database with fresh credentials on our server and write a new configuration.
Automatic security scan. After the import we scan the transferred data for malware and show you the result. If suspicious files are found, please contact us before putting the site online.
If something goes wrong
“No connector responds at this address”
The plugin is not active on the old site. Check under Plugins whether it is installed and activated.
“The migration code was not accepted”
The code was copied incompletely, or the plugin on the old site was deactivated in the meantime. Open Tools, Site Migration there again and copy the code anew.
“The site cannot be reached”
Your old site is not reachable from outside, for example because of a password protection, a maintenance mode or a firewall. Lift the protection for the duration of the migration.
WordPress network (multisite)
Multisite installations cannot be transferred automatically. Get in touch with us, we will handle the migration for you.
Do you run your own root server?
On all FireStorm web hosting plans the tool comes preinstalled, there is nothing you need to do. If, however, you run your own root server with Plesk at FireStorm, you install the extension once yourself: you will find the installation script in the download area of your customer account in the Rootserver category, and the matching API key on your root server’s product page in the DNS Manager section. After that, this guide applies to your server unchanged, and the extension keeps itself up to date automatically.
Need help?
Our support team is happy to help. You can reach us via our ticket system or by phone on 0844 300 200.