Distribution lists Microsoft365
16.10.2020
Skip to main content
-
Administration
- 30 Days Money Back
- Automatic payments
- Cancel a contract
- Change address data
- Change contact person (company)
- Change password
- Display bills
- FAQs about Infrastructure, Security, and Services
- Fewer Invoices
- Invoice by mail
- Manage Contacts
- Partner administration
- Password Forgotten
- Payment methods
- Payment slip
- Product Transfer
- Recruiting friends
- Reminder
- Server Data Centre
- Setting up two-factor authentication
- Storage Overview for Resellers
- Top up credit
- Unlock Express
- Webmail Link
- weitere Artikel ( 19 ) Einklappen
-
Cloud Storage
- Add as network drive
- Create cloud storage user
- first steps
- Login Cloud Memory
- mount under Linux
- PC backup to the cloud
- weitere Artikel ( 1 ) Einklappen
-
DNS Service
-
Domain
- .ZUERICH DOMAINS Register
- Activate Whois Privacy
- Cancel domain
- Change contacts
- Change DNS entries
- Change DNS Server
- Check DNSSEC
- Configure domain for mail traffic
- Connect website to Squarespace
- Connect website with Wix
- Connect your website to Jimdo
- Deactivate DNS Records
- Difference in domain redirect
- DNSSEC
- DNSSEC Deactivate
- Enable Domain Access
- Enable domain forwarding
- Extend domain
- Google Optimization
- Google search optimization
- Google SiteVerification
- Link domain
- Proper DNS records
- Questions about the domain
- Restriction forwarding
- Search engine registrationa
- Set up your own SPF server
- Transfer domain
- Use an Externally Registered Domain with FireStorm Hosting
- What is DANE/TLSA?
- What is MagicDANE?
- weitere Artikel ( 26 ) Einklappen
-
E-Mail
-
- Email does not reach me and the sender did not receive an error message
- Error "Client host rejected: cannot find your hostname"
- Gmail is blocking mails
- I get an error message when I send an email.
- I'm on a blacklist
- MacMail Problem: Required mailbox name to create ImapMailbox for (null)
- Proper DNS records
- Request emergency service
- weitere Artikel ( 3 ) Einklappen
-
- keine Artikel vorhanden
-
- keine Artikel vorhanden
-
- Change email password
- Create email address
- Create Email Forwarding
- Difference mailbox types
- DNSSEC
- Email Ports for IMAP, POP3, SMTP
- Emails using external provider
- Emails using external provider
- Exchange Konto übertragen
- Message "mailbox for user is full"
- Send e-mails
- Transfer Email
- Webmail Link
- What is DKIM?
- weitere Artikel ( 9 ) Einklappen
- Are our e-mails encrypted?
- Automatic e-mail reply
- Backup emails locally
- Change password
- Customize e-mail addresses in the Microsoft Portal
- E-Mail Signature
- E-Mail-Transfer Outlook (PST-File)
- external name servers
- Gmail is blocking mails
- Import Roundcube contacts into SOGo
- Important SPF entries
- JUNK Mail in Outlook
- Mail Log
- Newsletter Server important questions
- Office365 Logout and Setup
- Report SPAM Mails
- Restriction forwarding
- Send e-mails
- Send email as attachment
- Set up email alias
- Setting up an email account in Thunderbird
- SPF entry
- Webmail Link
- Webmail Login does not work
- What is DANE/TLSA?
- What is DKIM?
- What is MagicDANE?
- weitere Artikel ( 22 ) Einklappen
-
-
Einrichtung
-
Server
-
-
- Add module PGSQL in PHP
- Change IP at Confixx
- Confixx 3.1 End User Manual
- Confixx 3.1 Special Edition Manual for Administrators
- Confixx Server DBD::mysql or other PERL module displays error message
- Release Confixx database
- Setting up Apache server compression in Debian
- Setting up Apache server compression in SuSE
- Swap Confixx license
- weitere Artikel ( 4 ) Einklappen
-
- Add PHP version to chrooted
- Apache2 does not start
- Automatic detection with Plesk Server (Linux)
- Create customer in reseller hosting
- Install Node.JS version
- LINUX: Apache Crash at log rotation at UBUNTU
- LINUX: MySQL Upgrade von 5.5 auf 5.6 mit Ubuntu
- Linux: Restart Network Interface
- Linux: Too many open files in Ubuntu
- List storage space from Reseller
- Plesk can't start PHP-fpm
- Plesk DNS Manager Extension
- Plesk ELS
- Plesk Linux: Enable NGINX and HTTP/2
- Plesk Log Files
- PostgreSQL Update
- Repairing databases
- Special character problems
- Upgrade MSSQL Server
- Use PHP version
- weitere Artikel ( 15 ) Einklappen
- Allow Support Team Access
- Backup setup
- Convert Ubuntu MBR to GPT
- Empty directory quickly
- Empty Mailq
- Enlarge partition at Ubuntu 16.04
- How do I log in via SSH?
- Monitoring of RAID controllers
- MySQL with Docker
- Optimize your server
- Plesk ELS
- Proxmox installation problem: Fix Black Screen
- Questions about the root servers
- Reinstallation
- Remove Ubuntu old kernels
- Repair Mysql / MariaDB databases
- repair quota
- Resetting Windows password
- restore very old website
- Server does not boot
- Set up Mysql replication server
- Set up Remote Desktop licence
- Setting up Jitl
- SNF filter does not start
- Start NGINX manually
- Websites sporadically unavailable
- Windows Server 2019 Change language
- WordPress installieren
- weitere Artikel ( 23 ) Einklappen
-
-
-
ShopDesigner
-
- 1.00 The most important questions about ShopDesigner
- 1.01 Set up your online shop
- 1.02 Add products to your online shop
- 1.05 Product categories and keywords
- 1.06 Inventory and Inventory Tracking
- 1.07 Shipping options
- 1.08 Tax rates
- 1.09 Importing products from a CSV file
- 1.10 product variants
- 1.11 AGB for your OnlineShop
- 1.13 Set currency
- 1.16 OnlineShop Analysis
- Add Google Calendar
- Booking and calendar tool for SiteDesigner
- SiteDesigner Backup
- weitere Artikel ( 10 ) Einklappen
-
-
SiteDesigner
-
- 01 Adding and moving content
- 02 Colors and fonts
- 03 Website designs
- 04 Use a stock image
- 05 change an image
- 06 Add page
- 07 Set up a store
- 09 Site analytics
- 1.01 SiteDesigner Quickstart
- 1.02 Add basic page information
- 1.03 Change the appearance of your page
- 1.04 Pictures, Galleries and Presentations
- 1.05 Text and headings
- 1.09 Hide incomplete pages
- 1.10 Forms, cards and other content
- 1.11 Setting Language, Currency and Units
- 1.14 Re-sort and rearrange pages
- 1.15 SiteDesigner Mobile and mobile phone quick start
- 1.16 SiteDesigner Tablet Quickstart
- 1.17 How does the Template Editor work?
- 1.20 Undo changes
- 1.22 Setting up a user-defined contact form
- 10 Setup a blog
- 12 Multiple language sites
- 15 Contact forms
- Add Google Analytics
- Add Google Calendar
- add more pages to SiteDesigner
- Add number of pages to my page
- Add type of content to my website
- Advantage of SiteDesigner
- Create a link to any page
- Definition SiteDesigner
- Edit Site Template CSS
- Edit SiteDesigner with HTML code
- Embed external website
- Export page from SiteDesigner and send it to another server via FTP
- good page ranking?
- pay by phone with credit card
- Request Backup
- Request emergency service
- SiteDesigner Move Package
- Take website offline
- Webhosting to the SiteDesigner?
- weitere Artikel ( 39 ) Einklappen
- 01 Adding and moving content
- 02 Colors and fonts
- 03 Website designs
- 04 Use a stock image
- 05 change an image
- 06 Add page
- 09 Site analytics
- 10 Setup a blog
- 12 Multiple language sites
- 15 Contact forms
- Add a Popup
- Change language
- Fixed menu in the SiteDesigner
- PopUp hinzufügen
- SiteDesigner access
- weitere Artikel ( 10 ) Einklappen
-
SMS Gateway
-
SSL Certificates
- Activate SSL certificate
- Activate SSL certificate for forwarding
- Browser is not supported
- Certification Requirement (CSR)
- Conditions to be fulfilled
- Creating a Certification Requirement (CSR) for Apache
- Definition SSL CERTIFICATE
- Difference Domain and Identity Certification
- Intermediate certificate
- Let's Encrypt does not work
- Requirements for issuing an SSL Certificate
- SiteSeal
- SSL in Java Keystore
- the right certificate
- Wildcard certificate
- weitere Artikel ( 10 ) Einklappen
-
Technical
-
- add a new node to the cluster
- Add LVM-Thin
- Cache Settings
- CloudInit set up
- Import Windows
- Important Proxmox commands
- Installation frozen
- LVM Rename
- Migration shows no progress
- Nested Virtualisation
- No Login Prompt on a VM
- Optimise performance
- Proxmox shutdown
- Proxmox with Highpoint does not boot
- Proxmox with question Mark
- Reinstalling Proxmox-Server in Cluster
- Remove Proxmox VM Disk
- Repair Proxmox Cluster
- Replace ZFS disk
- Run Proxmox with NVME RAID
- Run Proxmox with NVME RAID
- VM hangs: Booting from Harddisk
- weitere Artikel ( 17 ) Einklappen
-
-
Webhosting
-
-
- Bugfix: Wordpress does not work anymore
- Copy WordPress
- Customizing the domain of a Wordpress website
- Increase PHP timeout
- Increase WordPress file upload limit
- Installing Wordpress
- load-scripts.php 500 Internal server error
- Permalinks in Wordpress (Windows)
- Rename URL
- Switch off Wordpress maintenance mode
- Transfer Wordpress Website
- WordPress - Login button is not displayed
- Wordpress DSGVO Tools (GDPR) hacked
- Wordpress DSGVO Tools (GDPR) hacked
- Wordpress login doesn't work, password reset doesn't work either
- xml-rpc.php Forbidden
- weitere Artikel ( 11 ) Einklappen
-
- Adding email accounts
- Change email password
- Difference mailbox types
- Emails using external provider
- Emails using external provider
- I receive SPAM via my contact form
- Import Roundcube contacts into SOGo
- Report SPAM Mails
- Set up e-mail
- Settings for Domains
- Spamfilter MagicSpam
- Spamfilter Plesk
- Transfer Email
- weitere Artikel ( 8 ) Einklappen
- Activate SSL certificate
- add another user
- Address book in Thunderbird
- Advantages of a website
- Blocking access for certain countries
- Browser Error Codes
- Change PHP version in Plesk (PHP 8.5)
- Database user password change
- Disable Website Cache
- Enable Directory Listing
- external access to database server
- How to create a custom error page
- Log in to Plesk
- Moving Hosting Package
- NodeJS Setup
- PHP disabled functions
- PHP.ini configuration
- Planning tasks
- Plesk Backup Manager
- Protect Website
- Request Backup
- restore very old website
- Ruby einrichten
- Transfer Website
- weitere Artikel ( 19 ) Einklappen
-
Du bist hier:
Drucken
Distribution lists Microsoft365
Distribution lists Microsoft365
1. create contact
- Register with admin.microsoft.de
- Go to the menu item “contacts”.
- Select Add contact.
- Enter your external employee with his or her e-mail address.
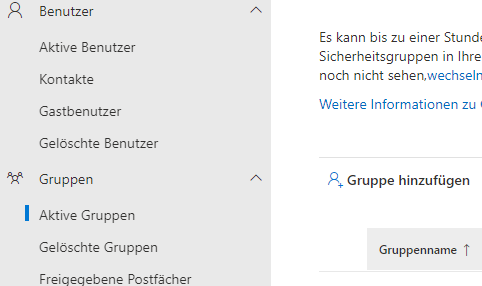
2. Create a group
- Click on Active Groups.

- Click on Add Groups.
- Select the item “Distribution”.
- Define a name, e.g. “Control” and a description of the distribution group to be created.
- Define the e-mail address to which the e-mails are to be sent. For example Steuern@YourDomain.ch.
- Complete the operation by clicking [Create Group].
- It may take a moment for the newly created distribution list to appear in the list of active groups.
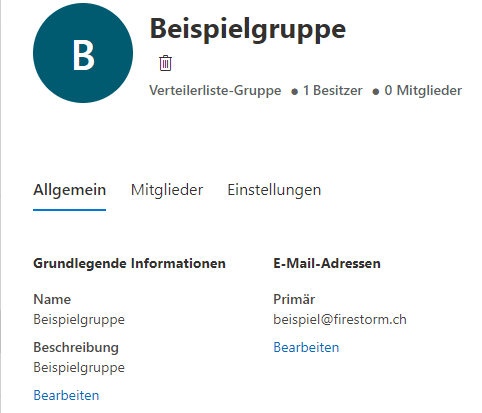
3. distributing members
- Click on the name of the created group (mailing list).

- Click on Members to the right of General.
- Click [View All and Manage Proprietary Members].
- Click [Add Members].
- Select all members you want to add to the group.
- Click the [Save] button.
- Click [Close] when all members have been added and saved.
4. test
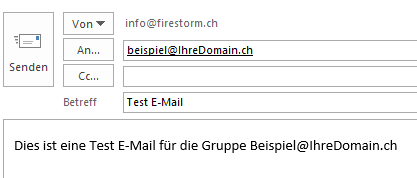
- Write a test e-mail to the newly created group, e.g. Steuern@YourDomain.ch.
All group members should now have received a copy of this test email.