



Set up CalDAV on a Mac
08.09.2021
Skip to main content
-
Administration
- 30 Days Money Back
- Automatic payments
- Cancel a contract
- Change address data
- Change contact person (company)
- Change password
- Change the term at renewal
- Credit rules: choose what your credit is used for
- Display bills
- Disputing an invoice
- eBill
- Emergency support costs
- Enable renewal notifications
- FAQ infrastructure and security
- Fell for phishing
- Fewer Invoices
- Invoice by mail
- Manage Contacts
- Monthly consolidated invoice
- No ticket confirmation received
- Ordering several reseller packages
- Partner administration
- Password Forgotten
- Payment methods
- Payment slip (QR-bill)
- Product Transfer
- Refer a friend
- Reminder
- Server Data Centre
- Set up a points alert
- Setting up two-factor authentication
- Sign-in blocked with VPN
- Sign-in from a new IP address
- Spotting fake invoices
- Storage Overview for Resellers
- Top up credit
- Unlock Express
- Webmail Link
- Withdraw a cancellation
- weitere Artikel ( 34 ) Einklappen
-
Cloud Storage
-
DNS Service
- CAA DNS Record
- Change DNS entries
- Change the SPF record
- Delegate a subdomain to another DNS provider
- DNS API
- DNS API Powershell example
- DNS records in the DNS package
- DNSSEC Deaktivieren
- DynDNS with a MikroTik router
- Export a DNS zone
- Let's Encrypt with Cert Warden
- Let's Encrypt with DNS validation
- Questions about DNS Service
- Reset SPF and DMARC
- Set up your own SPF server
- SPF entry
- TLD's that support DNSsec
- weitere Artikel ( 12 ) Einklappen
-
Domain
- Activate Whois Privacy
- Cancel domain and get auth code
- Change contacts
- Change DNS entries
- Change DNS Server
- Check DNSSEC
- Configure domain for mail traffic
- Connect or forward a domain
- Connect website to Shopify
- Connect website to Squarespace
- Connect website with Wix
- Connect your website to Jimdo
- Deactivate DNS Records
- Delegate a subdomain to another DNS provider
- DNSSEC
- DNSSEC Deaktivieren
- Domain lock
- Domainreseller
- Enable Domain Access
- Enable domain forwarding
- Export a DNS zone
- Extend domain
- Google Optimization
- Google search optimization
- Google SiteVerification
- How to get your website found on Google
- Link domain
- Own Nameserver
- Proper DNS records
- Questions about the domain
- Reset SPF and DMARC
- Restore a domain
- Restriction forwarding
- Sell your domain: how to put a domain up for sale
- Set up your own SPF server
- Transfer domain
- Use an external domain
- What is DANE/TLSA?
- What is MagicDANE?
- Withdraw a cancellation
- weitere Artikel ( 35 ) Einklappen
-
Email
-
- Email does not reach me and the sender did not receive an error message
- Error "Client host rejected: cannot find your hostname"
- Gmail is blocking mails
- I get an error message when I send an email.
- I'm on a blacklist
- MacMail Problem: Required mailbox name to create ImapMailbox for (null)
- Proper DNS records
- Request emergency service
- weitere Artikel ( 3 ) Einklappen
-
- keine Artikel vorhanden
-
- keine Artikel vorhanden
-
- keine Artikel vorhanden
-
- Address book in Thunderbird
- Iphone Mail Setup
- Move an Exchange ActiveSync Account
- Set Up an Autoresponder in Office 365
- Set up Android email
- Set up CalDAV on a Mac
- Set up DKIM
- Set up e-mail
- Set up Exchange ActiveSync (EAS)
- Set up Mac Mail
- Setting up an email account in Thunderbird
- Setting up CardDAV on a Mac
- Setting up Outlook
- weitere Artikel ( 8 ) Einklappen
- Are our e-mails encrypted?
- Automatic e-mail reply
- Automatic mailbox cleanup
- Backup emails locally
- Change password
- Customize e-mail addresses in the Microsoft Portal
- E-Mail Signature
- E-Mail-Transfer Outlook (PST-File)
- Email account hacked
- Enable Greylisting
- external name servers
- Frequently asked questions about the webmail switch to OfficeMail
- Gmail is blocking mails
- Important SPF entries
- JUNK Mail in Outlook
- Mail Log
- Mail Quarantine: held-back forwardings
- Newsletter Server important questions
- OfficeMail Account Settings
- Replies, conversation and settings in OfficeMail
- Report SPAM Mails
- Restriction forwarding
- Send e-mails
- Send email as attachment
- Set up email alias
- Setting up an email account in Thunderbird
- SPF entry
- Using OfficeMail
- Webmail Link
- Webmail Login does not work
- What is DANE/TLSA?
- What is DKIM?
- What is MagicDANE?
- Why Are My Emails Delayed?
- weitere Artikel ( 29 ) Einklappen
-
-
Server
-
-
- keine Artikel vorhanden
-
- Add PHP version to chrooted
- Apache2 does not start
- Create customer in reseller hosting
- Enable DNS Blacklists
- Install Node.JS version
- Linux: Too many open files in Ubuntu
- List storage space from Reseller
- Plesk can't start PHP-fpm
- Plesk DNS Manager Extension
- Plesk ELS
- Plesk Log Files
- PostgreSQL Update
- Separate access for third parties
- Use PHP version
- weitere Artikel ( 9 ) Einklappen
- Change reverse DNS (PTR) for your server
- Change the hostname of your root server
- Empty directory quickly
- Empty Mailq
- Enlarge partition at Ubuntu 16.04
- How do I log in via SSH?
- Important Docker commands
- Log and notifications
- Monitoring of RAID controllers
- MySQL with Docker
- Optimize your server
- Plesk ELS
- Proxmox installation problem: Fix Black Screen
- Questions about the root servers
- Reinstallation
- Remove Ubuntu old kernels
- Repair Mysql / MariaDB databases
- repair quota
- Resetting Windows password
- Restore a very old website
- Securing your root server
- Server does not boot
- Set up Mysql replication server
- Set up Remote Desktop licence
- SNF filter does not start
- SSH warning: host key changed
- Start NGINX manually
- Ubuntu Upgrade Service
- Unlock foreign access
- Upgrade a root server
- Websites sporadically unavailable
- Windows Server 2019 Change language
- WordPress installieren
- weitere Artikel ( 28 ) Einklappen
-
-
-
ShopDesigner
-
SiteDesigner
-
- 01 Adding and moving content
- 02 Colors and fonts
- 03 Website designs
- 04 Use a stock image
- 05 change an image
- 06 Add page
- 07 Set up a store
- 09 Site analytics
- 1.01 SiteDesigner Quickstart
- 1.02 Add basic page information
- 1.03 Change the appearance of your page
- 1.04 Pictures, Galleries and Presentations
- 1.05 Text and headings
- 1.09 Hide incomplete pages
- 1.10 Forms, cards and other content
- 1.11 Setting Language, Currency and Units
- 1.14 Re-sort and rearrange pages
- 1.15 SiteDesigner Mobile and mobile phone quick start
- 1.16 SiteDesigner Tablet Quickstart
- 1.17 How does the Template Editor work?
- 1.20 Undo changes
- 1.22 Setting up a user-defined contact form
- 10 Setup a blog
- 12 Multiple language sites
- 15 Contact forms
- Add Google Analytics
- Add Google Calendar
- add more pages to SiteDesigner
- Add number of pages to my page
- Add type of content to my website
- Advantage of SiteDesigner
- Booking and calendar tool for SiteDesigner
- Create a link to any page
- Definition SiteDesigner
- Edit Site Template CSS
- Edit SiteDesigner with HTML code
- Embed external website
- Export page from SiteDesigner and send it to another server via FTP
- good page ranking?
- Request Backup
- Request emergency service
- SiteDesigner Backup
- SiteDesigner Move Package
- Take website offline
- Webhosting to the SiteDesigner?
- weitere Artikel ( 40 ) Einklappen
- 01 Adding and moving content
- 02 Colors and fonts
- 03 Website designs
- 04 Use a stock image
- 05 change an image
- 06 Add page
- 07 Set up a store
- 09 Site analytics
- 10 Setup a blog
- 12 Multiple language sites
- 15 Contact forms
- Add a popup
- Adjusting the header in the SiteDesigner
- Change language
- Fixed menu in the SiteDesigner
- Form does not send emails
- Move pages into folders
- Open the SiteDesigner
- SiteDesigner access
- weitere Artikel ( 14 ) Einklappen
-
SMS Gateway
-
SSL Certificates
- Activate an SSL certificate for a forwarded domain
- Activate SSL certificate
- Browser is not supported
- Certificate warning on older devices
- Certification Requirement (CSR)
- Conditions to be fulfilled
- Creating a Certification Requirement (CSR) for Apache
- Definition SSL CERTIFICATE
- Difference Domain and Identity Certification
- Intermediate certificate
- Requirements for issuing an SSL Certificate
- SiteSeal
- SSL API
- SSL in Java Keystore
- the right certificate
- Wildcard certificate
- weitere Artikel ( 11 ) Einklappen
-
Technical
-
- Add LVM-Thin
- Cache Settings
- Important Proxmox commands
- Install QEMU Guest Agent
- Installation frozen
- LVM Rename
- Migration shows no progress
- Nested Virtualisation
- No Login Prompt on a VM
- Optimise performance
- Proxmox Cluster Nodes No Longer Visible in GUI
- Proxmox shutdown
- Proxmox with Highpoint does not boot
- Proxmox with question Mark
- Reinstalling Proxmox-Server in Cluster
- Remove Proxmox VM Disk
- Replace ZFS disk
- Set up CloudInit
- VM hangs: Booting from Harddisk
- weitere Artikel ( 14 ) Einklappen
-
- keine Artikel vorhanden
- Deactivate DNS Records
- Find Server by IP Address
- Fixing Synology file system errors
- LVM Rename
- Nextcloud Office Upgrade
- PowerDNS CLI Administration
- Proper DNS records
- Reinstalling Proxmox-Server in Cluster
- Restore rsnapshot Backup
- SOPHOS FIREWALL DOES NOT START
- Sophos Serial Number Shows "Default string"
- weitere Artikel ( 6 ) Einklappen
-
-
Webhosting
-
-
- Bugfix: Wordpress does not work anymore
- Copy WordPress
- Customizing the domain of a Wordpress website
- Increase PHP timeout
- Increase WordPress file upload limit
- Installing Wordpress
- load-scripts.php 500 Internal server error
- Move WordPress to FireStorm
- Permalinks in Wordpress (Windows)
- Rename URL
- Switch off Wordpress maintenance mode
- Transfer Wordpress Website
- WordPress - Login button is not displayed
- Wordpress login doesn't work, password reset doesn't work either
- WordPress: security measures
- WordPress: security warning received
- xml-rpc.php Forbidden
- weitere Artikel ( 12 ) Einklappen
-
- Check website for viruses
- Exclude folders from search engine
- Files are listed
- IP address blocked
- Log files
- Web application firewall
- Website loads slowly
- weitere Artikel ( 2 ) Einklappen
- Activate SSL certificate
- add another user
- Address book in Thunderbird
- Advantages of a website
- ASP.NET Core on Windows hosting
- Backup Manager: restore your data yourself
- Blocking access for certain countries
- Browser Error Codes
- Change hosting package
- Change PHP version in Plesk
- Change the password of a database user
- Difference between UNIX & Windows Hosting
- Disable Website Cache
- Enable Directory Listing
- How to create a custom error page
- Log in to Plesk
- Move hosting package
- Node.js as a permanent service
- NodeJS Setup
- PHP disabled functions
- PHP.ini configuration
- Planning tasks
- Plesk Backup Manager
- Protect a directory with a password
- Protect Website
- Request Backup
- Restore a very old website
- Set up Ruby
- Transfer a website
- Unlock foreign access for databases
- View used disk space
- Web Deploy XML File
- Website migration
- Where are the files of my website?
- weitere Artikel ( 29 ) Einklappen
-
-
Website-Builder
Du bist hier:
Drucken
Set up CalDAV on a Mac
This is how you set up a CalDAV account on your Mac so that you can use your online calendar in the Calendar app.
Note: These instructions apply exclusively to our Windows hosting packages. For Linux hosting packages, the CalDAV setup is described in a separate article: Thunderbird Calendar
Settings
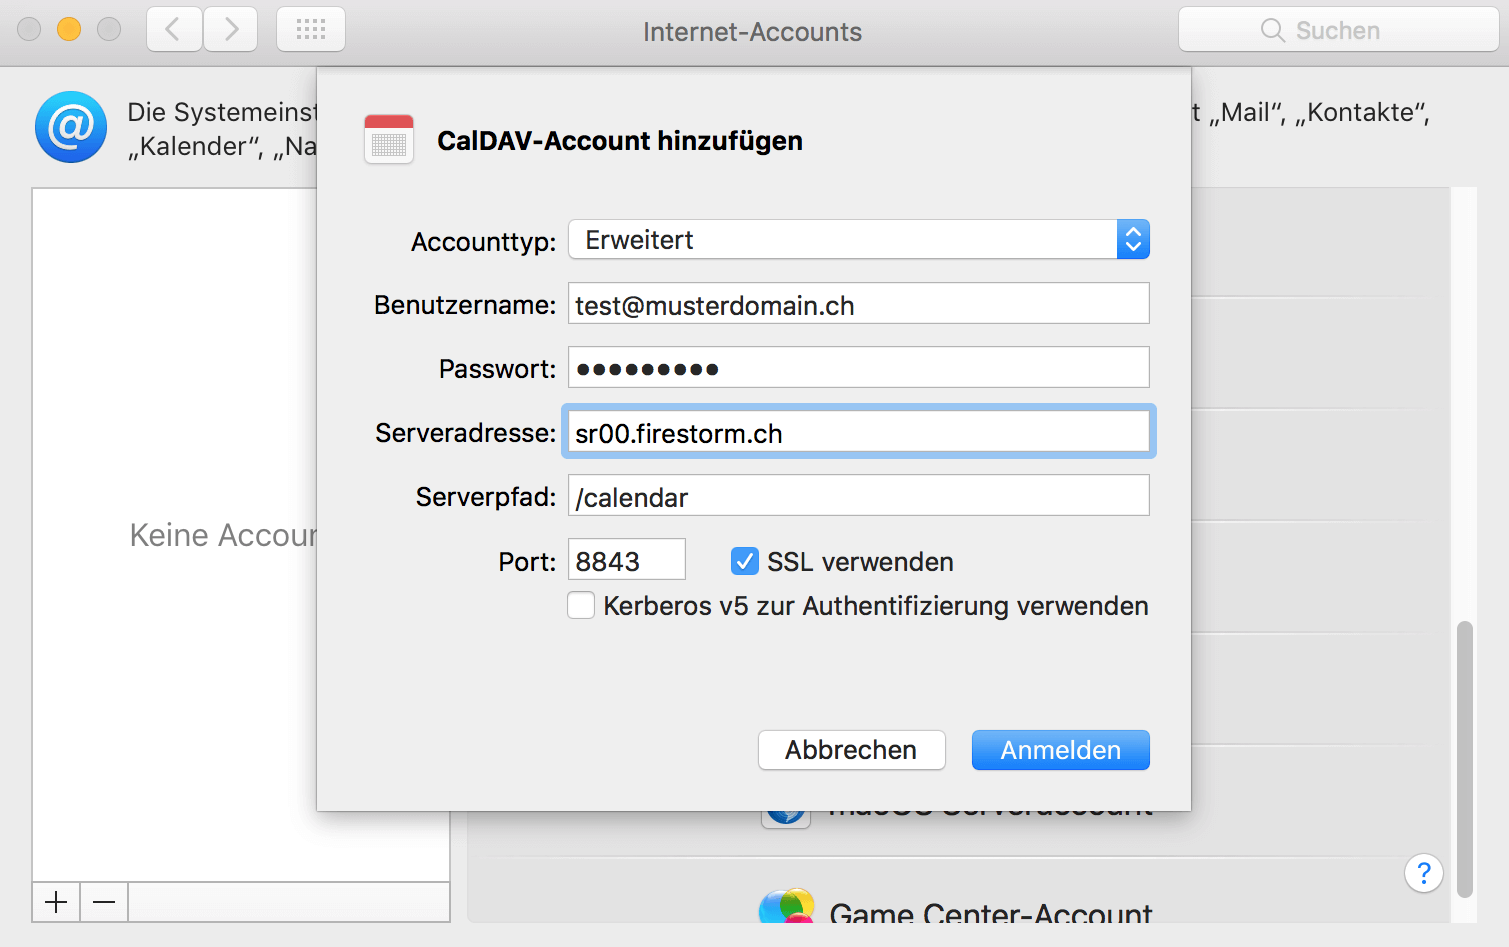
- User name: your email address
- Password: the password of your email address
- Server address:
srXX.firestorm.ch(replace srXX with your server) - Server path:
/calendar - Port:
8843with SSL
You can find your server in the customer center on the overview page of your hosting under «Server».
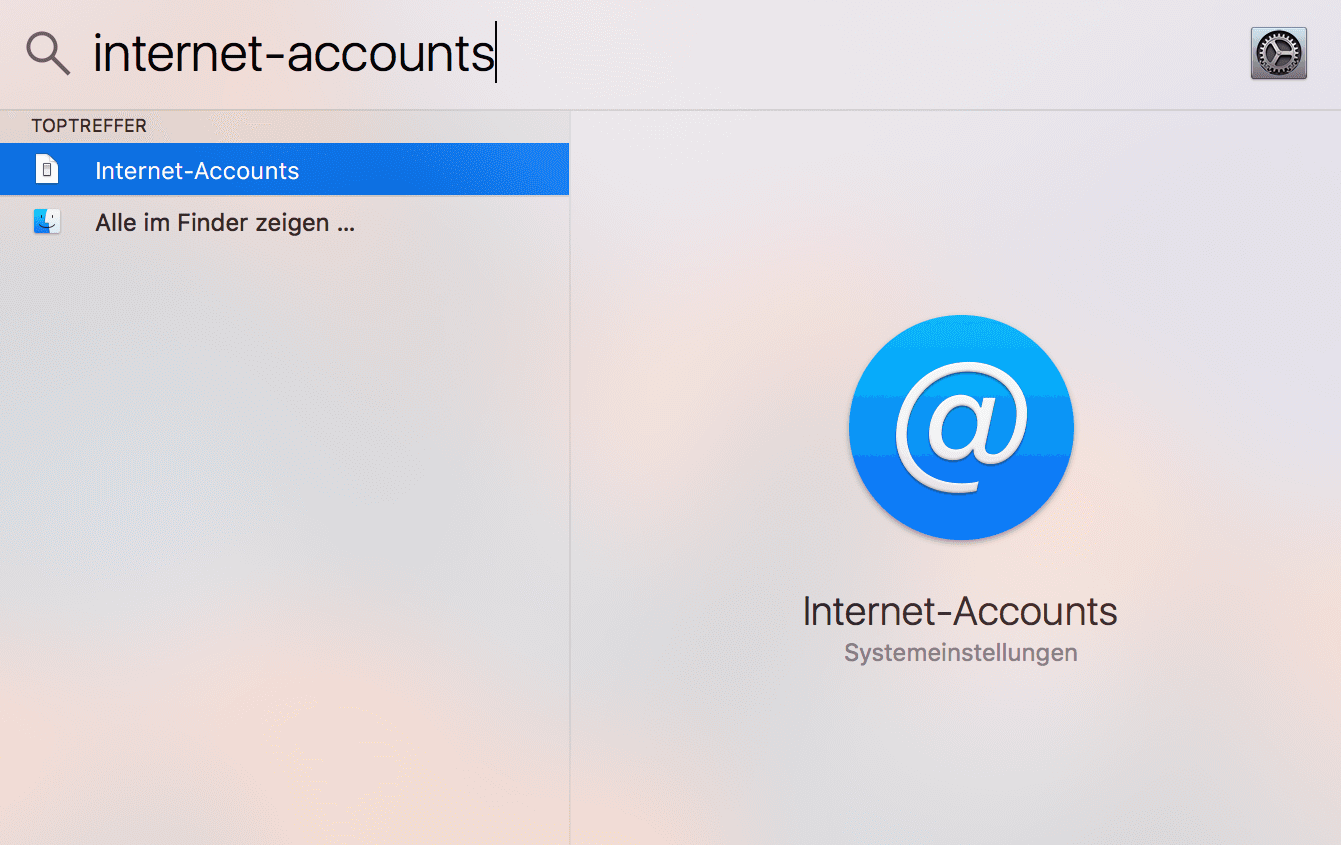
Step 1: Open Internet Accounts
On your Mac, open Spotlight search and search for Internet Accounts.
Step 2: Add a CalDAV account
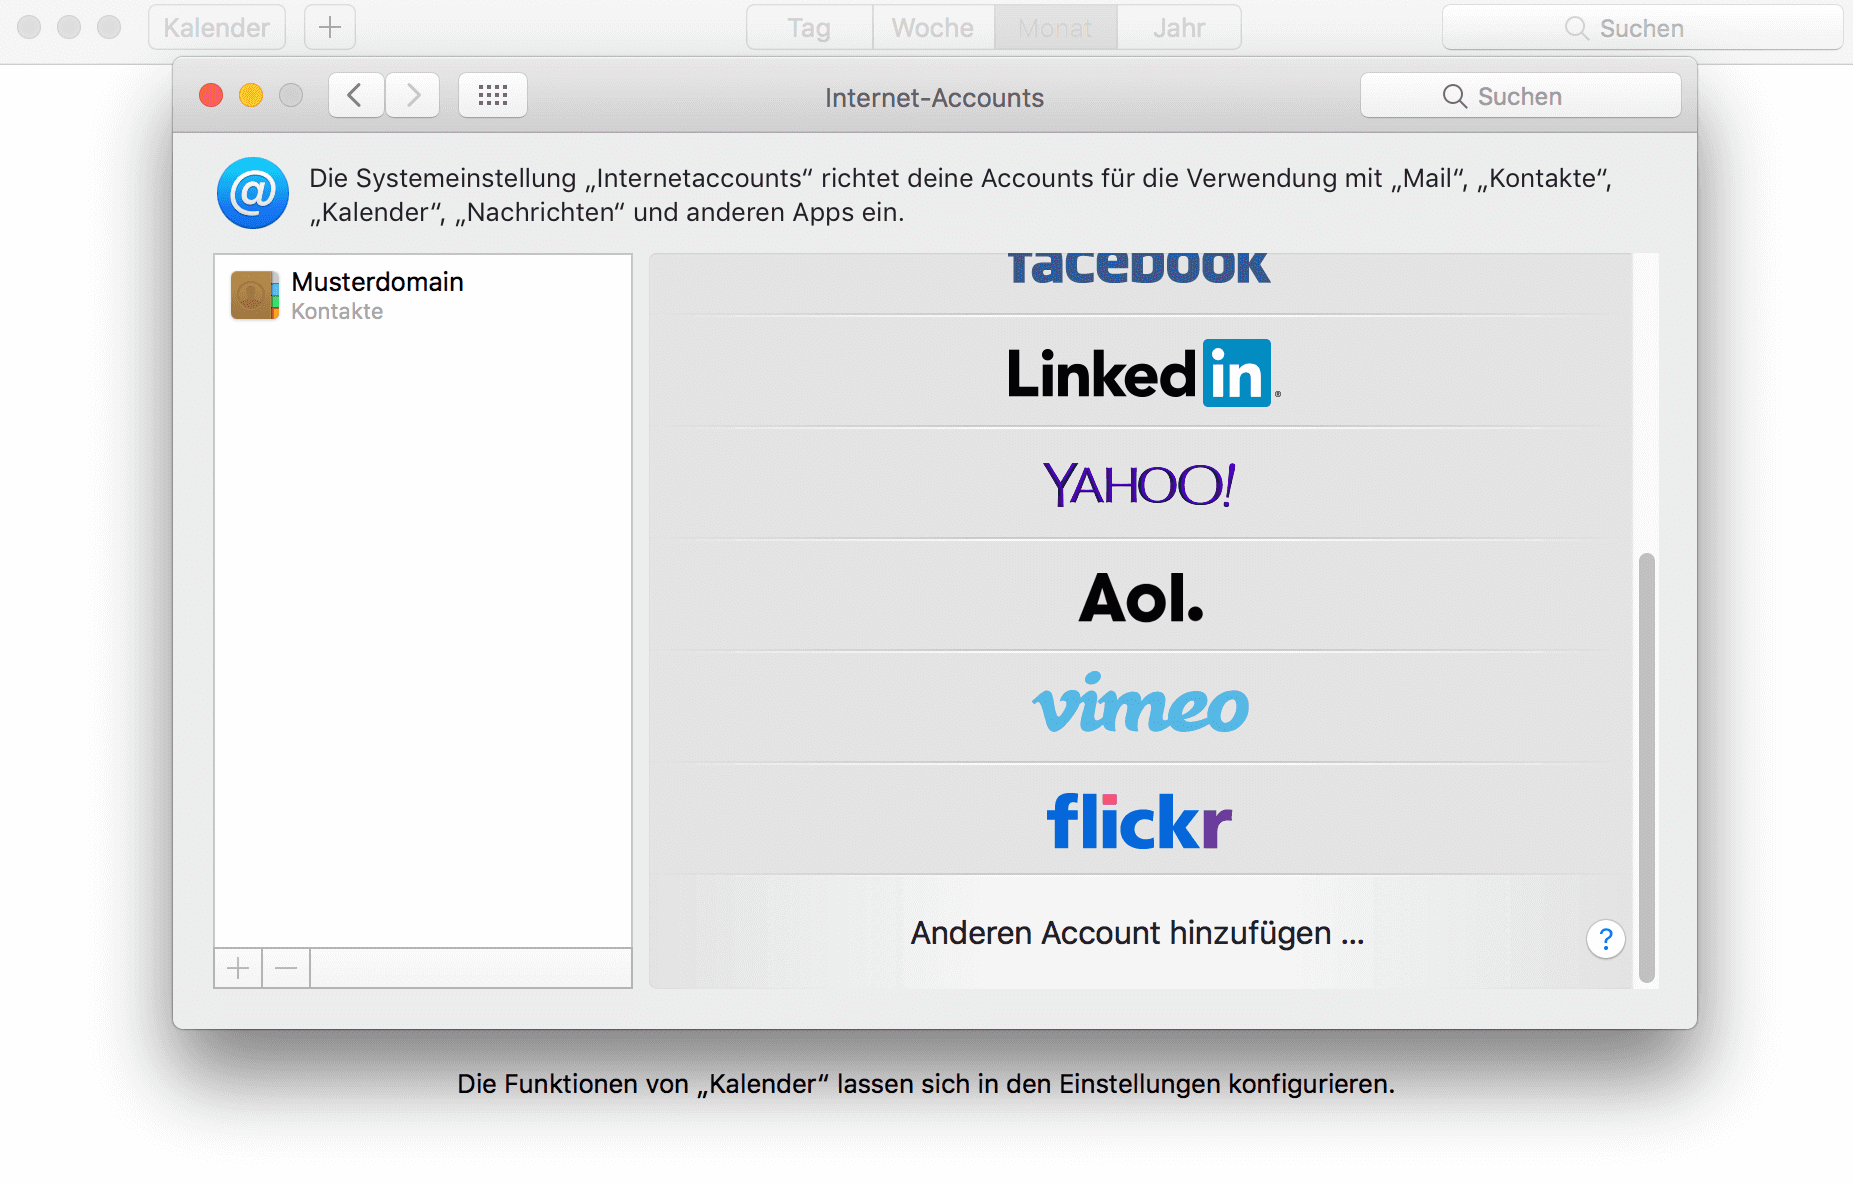
Click the plus sign, then Add Other Account, and select CalDAV account.
Step 3: Enter the settings and sign in
Select Advanced as the account type, fill in the fields with the settings above and click Sign In.
Step 4: Use the calendar
The account then appears on the left-hand side and you can use the online calendar as usual.